Getting Started with Conda
Overview
Teaching: 15 min
Exercises: 5 minQuestions
Why should I use a package and environment management system?
What is Conda?
How should I organize my project directory?
Objectives
Explain why you should use Conda as part of your research workflow.
Verify your Conda installation.
Learn to manage (create, update, remove, etc) Conda environments.
TLDR;
Here is the recipe for using Conda to manage a project specific software stack.
$ mkdir project-dir
$ cd project-dir
$ nano environment.yml # describe the environment
$ conda env create --prefix ./env --file environment.yml # create the environment
$ conda activate ./env # activate the environment
(/path/to/env) $ nano environment.yml # forgot to add some deps
(/path/to/env) $ conda env update --prefix ./env --file environment.yml --prune) # update the environment
(/path/to/env) $ conda deactivate # done working on project (for now!)
Why should I use a package and environment management system?
Installing software is hard. Installing scientific software (including all required dependencies of said software!) is often even more challenging. In order to minimize the burden of installing and updating software (data) scientists often install software packages that they need for their various projects system-wide.
Installing software system-wide has a number of drawbacks:
- can be difficult to figure out what software is required for any particular research project
- often impossible to install different versions of the same software package at the same time
- updating software required for one project can often “break” the software installed for another project
Put differently, installing software system-wide creates complex dependencies between your research projects that shouldn’t really exist!
Rather than installing software system-wide, wouldn’t it be great if we could install software separately for each research project?
Trade-offs of project specific software installs
What are some of the potential benefits from installing software separately for each project? What are some of the potential costs?
Solution
Notice that many of the potential benefits from installing software separately for each project require the ability to isolate the projects’ software environments from one another. Also, once you have figured out how to isolate project-specific software environments, you will still need to have some way to manage software packages appropriately.
Package management
A good package management system greatly simplifies the process of installing software by
- identifying and installing compatible versions of software and all required dependencies.
- handling the process of updating software as more recent versions become available.
If you use some flavor of Linux, then you are probably familiar with the package manager for your
Linux distribution (i.e., apt on Ubuntu, yum on CentOS); if you are a Mac OS user then you
might be familiar with the Home Brew Project which brings a Linux-like package
management system to Mac OS; if you are a Windows OS user, then you may not be terribly familiar
with package managers as there isn’t really a standard package manager for Windows (although there
is the Chocolatey Project).
Operating system package management tools are great but these tools actually solve a more general problem than you often face as a (data) scientist. As a (data) scientist you typically use one or two core scripting languages (i.e., Python, R, SQL). Each scripting language has multiple versions that can potentially be installed and each scripting language will also have a large number of third-party packages (and additional dependencies) that will need to be installed. The exact version of your core scripting language(s) and additional, third-party packages will also probably change from project to project.
Environment management
An environment management system solves a number of problems commonly encountered by (data) scientists.
- An application you need for a research project requires different versions of Python or different versions of various Python packages from the versions that you are currently using.
- An application you developed as part of a previous research project that worked fine on your system six months ago now no longer works.
- Code that have written for a joint research project works on your machine but not on your collaborators’ machines.
- A machine learning application that you are developing on your local machine doesn’t provide the same results when run on your remote cluster.
An environment management system enables you to set up a new, project specific software environment containing specific Python (R) versions as well as the versions of additional packages and required dependencies that are all mutually compatible.
- Environment management systems help resolve dependency issues by allowing you to use different versions of a package for different projects.
- Make your projects self-contained and reproducible by capturing all package dependencies in a single requirements file.
- Allow you to install packages on a host on which you do not have admin privileges.
What is Conda?
From the official Conda documentation. Conda is an open source package and environment management system that runs on Windows, Mac OS and Linux.
- Conda can quickly install, run, and update packages and their dependencies.
- Conda can create, save, load, and switch between project specific software environments on your local computer.
- Although Conda was created for Python programs, Conda can package and distribute software for any language such as R, Ruby, Lua, Scala, Java, JavaScript, C, C++, FORTRAN.
Conda as a package manager helps you find and install packages. If you need a package that requires a different version of Python, you do not need to switch to a different environment manager, because Conda is also an environment manager. With just a few commands, you can set up a totally separate environment to run that different version of Python, while continuing to run your usual version of Python in your normal environment.
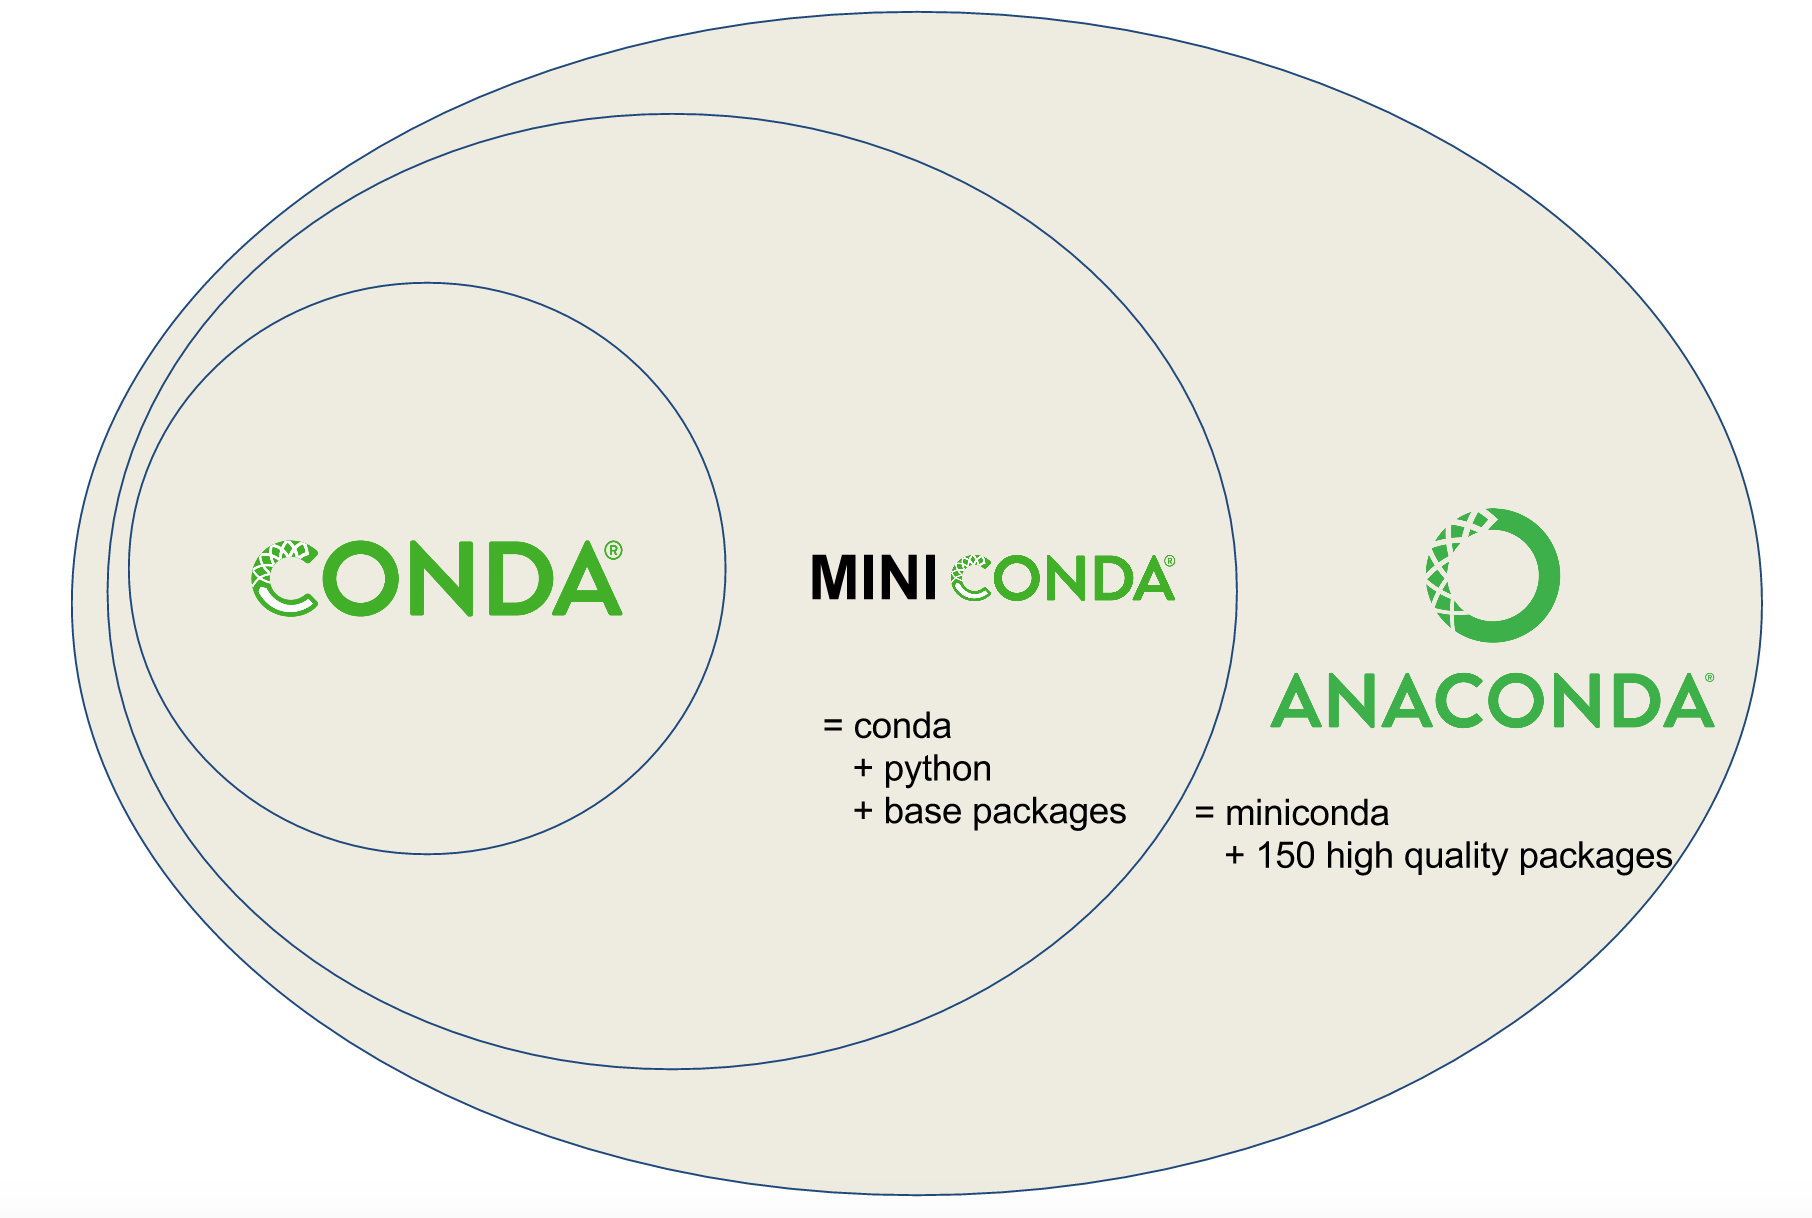
Conda vs. Miniconda vs. Anaconda
Users are often confused about the differences between Conda, Miniconda, and Anaconda. Miniconda (which we will install below!) combines Conda with Python 3 and a small number of core packages; Anaconda includes Miniconda as well as over 150 of the most widely used Python packages.
Installing Conda
As long as you have already installed the Python 3 Miniconda or Anaconda Python distributions, then Conda has already been installed on your machine. If you have not already installed one of the recommended Python 3 distibutions then please see the setup instructions for details.
In order to verify that you have installed Conda correctly run the conda info command in the
Terminal (Mac OS or Linux) or Anaconda Powershell Prompt (Windows)
Mac OS
There are two ways to open Terminal on Mac.
- In your Applications folder, open Utilities and double-click on Terminal
- Press Command + spacebar to launch Spotlight. Type
Terminaland then double-click the search result or hit Enter.
Windows
Windows users will need to search for the “Anaconda Prompt” in the search menu. Clicking on the application will launch the prompt.
Regardless of OS, the output of the command should look similar to the following. Note that the
conda version number is provided as part of the output of this command.
$ conda info
     active environment : base
    active env location : /Users/$USERNAME/miniconda3
            shell level : 1
       user config file : /Users/$USERNAME/.condarc
 populated config files :
          conda version : 4.8.3
    conda-build version : not installed
         python version : 3.7.6.final.0
       virtual packages : __osx=10.15.6
       base environment : /Users/$USERNAME/opt/miniconda3  (writable)
           channel URLs : https://repo.anaconda.com/pkgs/main/osx-64
                          https://repo.anaconda.com/pkgs/main/noarch
                          https://repo.anaconda.com/pkgs/r/osx-64
                          https://repo.anaconda.com/pkgs/r/noarch
          package cache : /Users/$USERNAME/opt/miniconda3/pkgs
                          /Users/$USERNAME/.conda/pkgs
       envs directories : /Users/$USERNAME/opt/miniconda3/envs
                          /Users/$USERNAME/.conda/envs
               platform : osx-64
             user-agent : conda/4.8.3 requests/2.23.0 CPython/3.7.6 Darwin/19.6.0 OSX/10.15.6
                UID:GID : 502:20
             netrc file : None
           offline mode : False
An alternative solution is to run the conda command and pass the --version flag which will
return the version number if Conda has been properly installed.
$ conda --version
conda 4.8.3
Make sure you have the most recent version
The version of Conda included with the most recent version of Miniconda might not be the latest version of Conda. Run the following command to make sure that you have the most recent version and of Conda (including bug fixes!).
$ conda update --name base --channel defaults --yes conda
You can re-run this command at any time to update to the most recent version of Conda.
Managing Conda Environments
New Project, New Directory
Every new project (no matter how small!) should live in its own directory. While the topic of project organization “best practices” could be an episode in itself, a good reference to get started is Good Enough Practices for Scientific Computing. Let’s create a new project directory for today’s workshop.
$ cd ~/Desktop
$ mkdir python-novice-gapminder
$ cd python-novice-gapminder
New Project, New Environment
Now that we have a new project directory we are ready to create a new environment for our project. We will do this in two steps: first we will create an environment file that describes the software dependencies (including specific version numbers!) for the project; second we will use the newly created environment file to build the software environment. Let’s see how to accomplish each of these steps in turn.
Creating an Environment File
In order to make sure that your environment is truly shareable, we need to make sure that that the contents of your environment are described in such a way that the resulting environment file can be used to re-create your environment on Linux, Mac OS, and Windows. Conda uses YAML (“YAML Ain’t Markup Language”) for writing its environment files. YAML is a human-readable data-serialization language that is commonly used for configuration files and that uses Python-style indentation to indicate nesting.
Default
environment.ymlfileNote that by convention Conda environment files are called
environment.yml. As such if you use theconda env createsub-command without passing the--fileoption, thencondawill expect to find a file calledenvironment.ymlin the current working directory and will throw an error if a file with that name can not be found.
Let’s take a look at a canonical environment.yml file to give you an idea of how to write
your own environment files. The following is a minimal environment.ymlfile. Note that we specify
a name for the environment (which can be null) followed by our project dependencies.
name: python-novice-gapminder-env

dependencies:
  - python=3.8
  - matplotlib
  - pandas
Always specify version numbers for your dependencies!
In order to make your results more reproducible and to make it easier for research colleagues to recreate your Conda environments on their machines it is a “best practice” to always explicitly specify the version number for each package that you install into an environment. If you are not sure exactly which version of a package you want to use, then you can use search to see what versions are available using the following command.
$ conda search $PACKAGE_NAMESo, for example, if you wanted to see what versions of Pandas are available you would run the following.
$ conda search pandasAs always you can run
conda search --helpto learn about available options.
Creating an
environment.ymlfileUsing the example above, create a file called
environment.ymlin thepython-novice-gapminderdirectory.Solution
The following commands can be used to create the
environment.ymlfile.$ nano environment.yml # copy and paste the above text in the buffer; save and close
Creating a New Environment From an environment.yml File
Let’s suppose that you want to use the environment.yml file defined above to create a Conda
environment in a sub-directory of your project directory. Creating your Conda environment as a sub-
directory inside your project directory is another “best practice”.
$ conda env create --prefix ./env --file environment.yml
Always version control your
environment.ymlfiles!While you should never version control the contents of your
env/environment sub-directory, you should always version control yourenvironment.ymlfiles. Version controlling yourenvironment.ymlfiles together with your project’s source code means that you always know which versions of which packages were used to generate your results at any particular point in time.
Activating the Environment
Activating environments is essential to making the software in environments work well (or sometimes at all!). Activation of an environment does two things.
- Adds entries to
PATHfor the environment. - Runs any activation scripts that the environment may contain.
Step 2 is particularly important as activation scripts are how packages can set arbitrary environment variables that may be necessary for their operation. On a Unix system you activate the environment using the following command.
$ conda activate ./env
You can see that an environment has been activated because the shell prompt will now include the absolute path to the active environment.
(absolute/path/to/project-dir/env) $
Initializing Conda properly setup for your shell
Conda 4.4 introduced new scripts that make activation behavior uniform across operating systems. Where previously you once had
source activate envnameon Unix, and justactivate envnameon Windows, Conda 4.4 allowedconda activate envname. Setting up your shell to use this new feature was tricky. Conda 4.6 added extensive initialization support so that more shells can use the newconda activatecommand. For more information, read the output fromconda init –-help.$ conda init bashAfter running
conda inityou will need to close and restart your shell for changes to take effect. Alternatively, you can reload your.bashrcprofile (which was changed by running theconda initcommand). To reload your.bashrcprofile, use the following command.$ . ~/.bashrcIf you want to reverse or “undo” the changes to your
.bashrc, then you can re-run theconda initcommand and pass the--reverseoption.(base) $ conda init --reverseAgain, in order for the reversal to take effect you will likely need to close and restart your shell session.
Updating the Environment
You are unlikely to know ahead of time which packages (and version numbers!) you will need to use for your research project. For example it may be the case that…
- one of your core dependencies just released a new version (dependency version number update).
- you need an additional package for data analysis (add a new dependency).
- you have found a better visualization package and no longer need to old visualization package (add new dependency and remove old dependency).
If any of these occurs during the course of your research project, all you need to do is update
the contents of your environment.yml file accordingly and then run the following command.
$ conda env update --prefix ./env --file environment.yml --prune
Note that the --prune option cause Conda to remove any dependencies that are no longer required
from the environment.
Adding JupyterLab to the environment.
Add JupyterLab to your
environment.ymlfile and update the environment.Solution
The
environment.ymlfile should now look as follows.name: python-novice-gapminder-env dependencies: - python=3.8 - jupyerlab - matplotlib - pandasThe following command will update the environment accordingly.
$ conda env update --prefix ./env --file environment.yml --prune
Getting the Gapminder Data
The data we will be using is taken from the gapminder dataset. To obtain it, download python-novice-gapminder-data.zip and then unzip the contents of the file within the
python-novice-gapminderdirectory.On Mac OS or Linux the following commands should move the
.ziparchive from the downloads folder to thepython-novice-gapminderdirectory we previously created on the desktop. Unzipping theziparchive will create adatadirectory containing the*.csvfiles that we will use in the remaining lessons.$ mv ~/Downloads/python-novice-gapminder-data.zip ~/Desktop/python-novice-gapminder $ cd ~/Desktop/python-novice-gapminder $ unzip python-novice-gapminder-data.zip
Deactivating the Environment
When you are done working on your project it is a good idea to deactivate the current environment.
To deactivate the currently active environment use the deactivate command as follows.
(absolute/path/to/project-dir/env) $ conda deactivate
You can see that an environment has been deactivated because the shell prompt will no longer include the name of the active environment.
$
Returning to the
baseenvironmentTo simply return to the
baseConda environment, it’s better to callconda activatewith no environment specified, rather than to usedeactivate. If you runconda deactivatefrom yourbaseenvironment, you may lose the ability to runcondacommands at all. Don’t worry if you encounter this undesirable state! Just start a new shell.
$ conda deactivate
Key Points
Using a package and environment management tool facilitates reproducible research workflows.
Conda is a platform agnostic, open source package and environment management system.
Every project should have its own directory and its own environment.
A project’s environment should be installed as a sub-directory within the project directory.